Contents
RIP version2を使ったダイナミックルーティングの設定をする
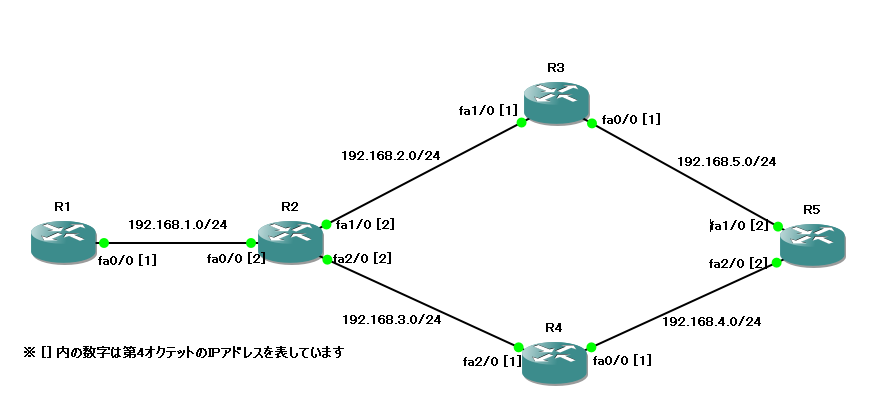
各ルータには既にIPアドレスが割り当てられています。
◆R1のルーティングテーブル
R1#sh ip route
~略~
      192.168.1.0/24 is variably subnetted, 2 subnets, 2 masks
C        192.168.1.0/24 is directly connected, FastEthernet0/0
L        192.168.1.1/32 is directly connected, FastEthernet0/0
R1#
◆R2のルーティングテーブル
R2#sh ip route
~略~
      192.168.1.0/24 is variably subnetted, 2 subnets, 2 masks
C        192.168.1.0/24 is directly connected, FastEthernet0/0
L        192.168.1.2/32 is directly connected, FastEthernet0/0
      192.168.2.0/24 is variably subnetted, 2 subnets, 2 masks
C        192.168.2.0/24 is directly connected, FastEthernet1/0
L        192.168.2.2/32 is directly connected, FastEthernet1/0
      192.168.3.0/24 is variably subnetted, 2 subnets, 2 masks
C        192.168.3.0/24 is directly connected, FastEthernet2/0
L        192.168.3.2/32 is directly connected, FastEthernet2/0
R2#
◆R3のルーティングテーブル
R3#sh ip route
~略~
      192.168.2.0/24 is variably subnetted, 2 subnets, 2 masks
C        192.168.2.0/24 is directly connected, FastEthernet1/0
L        192.168.2.1/32 is directly connected, FastEthernet1/0
R3#
◆R4のルーティングテーブル
R4#sh ip route
~略~
      192.168.3.0/24 is variably subnetted, 2 subnets, 2 masks
C        192.168.3.0/24 is directly connected, FastEthernet2/0
L        192.168.3.1/32 is directly connected, FastEthernet2/0
R4#
◆R5のルーティングテーブル
R5#sh ip route
~略~
      192.168.5.0/24 is variably subnetted, 2 subnets, 2 masks
C        192.168.5.0/24 is directly connected, FastEthernet1/0
L        192.168.5.2/32 is directly connected, FastEthernet1/0
R5#
R1~R5のルーティングテーブルには直接接続の情報のみ存在しています。
◆R1にRIP version2の設定を入れる
R1#conf t
R1(config)#router rip
R1(config-router)#version 2
R1(config-router)#network 192.168.1.0
R1(config-router)#end
R1#
◆R2にRIP version2の設定を入れる
R2#conf t
R2(config)#router rip
R2(config-router)#version 2
R2(config-router)#network 192.168.1.0
R2(config-router)#network 192.168.2.0
R2(config-router)#network 192.168.3.0
R2(config-router)#end
R2#
◆R3にRIP version2の設定を入れる
R3#conf t
R3(config)#router rip
R3(config-router)#version 2
R3(config-router)#network 192.168.2.0
R3(config-router)#network 192.168.5.0
R3(config-router)#end
R3#
◆R4にRIP version2の設定を入れる
R4#conf t
R4(config)#router rip
R4(config-router)#version 2
R4(config-router)#network 192.168.3.0
R4(config-router)#network 192.168.4.0
R4(config-router)#end
R4#
◆R5にRIP version2の設定を入れる
R5#conf t
R5(config)#router rip
R5(config-router)#version 2
R5(config-router)#network 192.168.4.0
R5(config-router)#network 192.168.5.0
R5(config-router)#end
R5#
RIP設定後の各ルータのルーティングテーブルを見てみましょう。
◆R1のルーティングテーブル
R1#sh ip route
~略~
      192.168.1.0/24 is variably subnetted, 2 subnets, 2 masks
C        192.168.1.0/24 is directly connected, FastEthernet0/0
L        192.168.1.1/32 is directly connected, FastEthernet0/0
R     192.168.2.0/24 [120/1] via 192.168.1.2, 00:00:00,
FastEthernet0/0
R     192.168.3.0/24 [120/1] via 192.168.1.2, 00:00:00,
FastEthernet0/0
R     192.168.4.0/24 [120/2] via 192.168.1.2, 00:00:00,
FastEthernet0/0
R     192.168.5.0/24 [120/2] via 192.168.1.2, 00:00:00,
FastEthernet0/0
R1#
◆R2のルーティングテーブル
R2#sh ip route
      192.168.1.0/24 is variably subnetted, 2 subnets, 2 masks
C        192.168.1.0/24 is directly connected, FastEthernet0/0
L        192.168.1.2/32 is directly connected, FastEthernet0/0
      192.168.2.0/24 is variably subnetted, 2 subnets, 2 masks
C        192.168.2.0/24 is directly connected, FastEthernet1/0
L        192.168.2.2/32 is directly connected, FastEthernet1/0
      192.168.3.0/24 is variably subnetted, 2 subnets, 2 masks
C        192.168.3.0/24 is directly connected, FastEthernet2/0
L        192.168.3.2/32 is directly connected, FastEthernet2/0
R     192.168.4.0/24 [120/1] via 192.168.3.1, 00:00:10,
FastEthernet2/0
R     192.168.5.0/24 [120/1] via 192.168.2.1, 00:00:14,
FastEthernet1/0
R2#
◆R3のルーティングテーブル
R3#sh ip route
~略~
R     192.168.1.0/24 [120/1] via 192.168.2.2, 00:00:03,
FastEthernet1/0
      192.168.2.0/24 is variably subnetted, 2 subnets, 2 masks
C        192.168.2.0/24 is directly connected, FastEthernet1/0
L        192.168.2.1/32 is directly connected, FastEthernet1/0
R     192.168.3.0/24 [120/1] via 192.168.2.2, 00:00:03,
FastEthernet1/0
R     192.168.4.0/24 [120/2] via 192.168.2.2, 00:00:03,
FastEthernet1/0
      192.168.5.0/24 is variably subnetted, 2 subnets, 2 masks
C        192.168.5.0/24 is directly connected, FastEthernet0/0
L        192.168.5.1/32 is directly connected, FastEthernet0/0
R3#
◆R4のルーティングテーブル
R4#sh ip route
~略~
R     192.168.1.0/24 [120/1] via 192.168.3.2, 00:00:04,
FastEthernet2/0
R     192.168.2.0/24 [120/1] via 192.168.3.2, 00:00:04,
FastEthernet2/0
      192.168.3.0/24 is variably subnetted, 2 subnets, 2 masks
C        192.168.3.0/24 is directly connected, FastEthernet2/0
L        192.168.3.1/32 is directly connected, FastEthernet2/0
      192.168.4.0/24 is variably subnetted, 2 subnets, 2 masks
C        192.168.4.0/24 is directly connected, FastEthernet0/0
L        192.168.4.1/32 is directly connected, FastEthernet0/0
R     192.168.5.0/24 [120/2] via 192.168.3.2, 00:00:04,
FastEthernet2/0
R4#
◆R5のルーティングテーブル
R5#sh ip route
~略~
R     192.168.1.0/24 [120/2] via 192.168.5.1, 00:00:11,
FastEthernet1/0
      192.168.2.0/24 is variably subnetted, 2 subnets, 2 masks
C        192.168.2.0/24 is directly connected, FastEthernet2/0
L        192.168.2.2/32 is directly connected, FastEthernet2/0
R     192.168.3.0/24 [120/2] via 192.168.5.1, 00:00:11,
FastEthernet1/0
R     192.168.4.0/24 [120/3] via 192.168.5.1, 00:00:11,
FastEthernet1/0
      192.168.5.0/24 is variably subnetted, 2 subnets, 2 masks
C        192.168.5.0/24 is directly connected, FastEthernet1/0
L        192.168.5.2/32 is directly connected, FastEthernet1/0
R5#
<<解説>>

・router rip
・network [通知するNWアドレス(I/Fが所属するNWアドレス)]
例)R2の場合
fa0/0のIPアドレス192.168.1.2/24 ⇒ network 192.168.1.0
fa1/0のIPアドレス192.168.2.2/24 ⇒ network 192.168.2.0
fa2/0のIPアドレス192.168.3.2/24 ⇒ network 192.168.3.0
・R1のルーティングテープルの見方
R 192.168.5.0/24 [120/2] via 192.168.1.2, 00:00:00, FastEthernet0/0
左から順に
⇒ RIPで学習したもの
⇒ 192.168.5.0/24のルーティング情報を学習した
⇒ AD(アドミニストレイティブ・ディスタンス)が120
⇒ metric(メトリック)が2で
⇒192.168.1.2(R2のfa0/0)から来た情報
⇒学習してから00:00:00(00時間00分00秒)が経過
⇒自分(R1)のfa0/0で受信した
ディスタンスベクタ型のルーティングプロトコルと言われ、
距離と方向を元に経路を決めています。
RIPが使われない主な理由は下記の2つです。
・ネットワーク全体で最大15台までしか経由できない(16ホップは到達できない)
・定期的なアップデート
15台しかルータを経由できないネットワーク設計など拡張性がありません。
ルーティング情報も定期的に交換します。
この定期的というのが厄介で、ネットワークに何も変化が起きていなくても、
「私が持っている情報はこれです」というやりとりが繰り返されます。
今どきRIPは使われないので覚えなくていいという本や記事が多いです。
RIPについては簡単な概要を理解すれば大丈夫です。